The Joy of Mastering Steaks
There’s no ‘how to cook a perfect steak’ recipe that applies to all steaks. This is because there are all different kinds of steaks and they come in all different sizes and thicknesses. What you need in order to master steaks are the basic rules and then a good adjustable method that you will get better at with experience. My son Craig has become very good at it and he can pass his method on to others, along with many of the ongoing nuances of cooking steaks as you get into the joy of mastering steaks.
If you go online to look at the ‘recipes’ for perfect steaks, you’re going to find a lot of differences of opinion concerning the nuances of steak cooking. But there are basic rules for cooking great steaks that everyone agrees on — selecting a good steak, seasoning the steak right, getting a good sear on the steak, knowing when the steak is done, then letting it rest.
Selecting the Steak
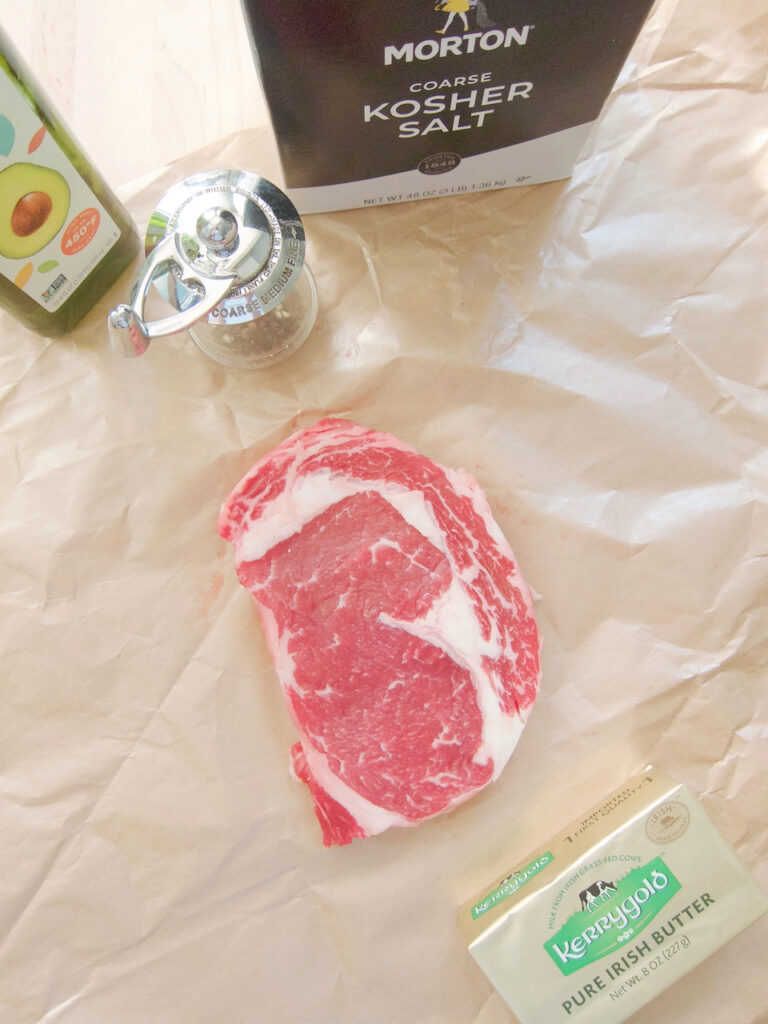
The ideal steak for beginners is a boneless rib eye steak, but this isn’t starting at the bottom when it comes to a good steak. Rib eye steaks are most people’s favorite steak, and after doing some experimenting you may decide it’s the only one you ever want to buy. A New York strip steak is also a good beginner steak. What you don’t want to start with is T-bones and porterhouses because these steaks are made of two kinds of steaks, a Rube’s New York Strip steak and on the other side is a filet or tenderloin, that cook very differently. Cooking both sides of these steaks properly is an advanced technique done on a grill. Craig recommends starting with the other two cuts and then you can move on to mastering these luxury steaks.
As you are shopping, you are going to notice that every steak is a different size and thickness but, more importantly, have varying amounts of marbling, the little streams of white fat running through them. Marbling adds both tenderness and flavor to steaks. As part of this first goal of choosing the right steak you need to learn how to spot steaks that are well marbled.
Steaks are rated select, choice and prime. Prime has the most marbling and select the least. Costco has high quality choice and prime steaks at good prices. Look at the quality of the meat and the prices at the grocery stores around you. Then go to Costco and look at theirs. If you run into packages labeled Angus beef, these are supposed to be better quality, more marbled, both in the choice and prime sections of the meat case.
Note: Generally 100% Grass fed steaks have a small amount of marbling. These steaks need to be cooked differently if you want them to be as tender as possible.
After you get marbling down, these two videos will take choosing the best steaks to the next level.
In this video expert Chad Mackay will teach you what to look for when you are choosing a New York steak just like the high end restaurants do. He will show you a tendon that runs through them that you want to avoid. New York steaks, T-bones and porterhouses are from the loin (short loin) section of a cow and the ones with the tendon show up at a certain point as a butcher is cutting these steaks. Chad will show you how to look for these. His restaurant doesn’t serve steaks with this tendon running through it.
In this video expert Jess Priles explains that a rib eye steak is actually made of three muscles; a tail, an eye, and a cap or spinalis. The spinalis is the “king of steaks”. In the video she has two rib eye steaks on a cutting board, one with a larger spinalis and the other with a small one. Rib eye steaks are from the rib section of a cow, between with the chuck section and the loin (short loin) section. The spinalis runs the length of the rib section but it is smallest at the loin end. She says the biggest are in the center and then the spinalis starts to get smaller towards the chuck end. As she shops for her steaks, she is looking for steaks with the largest spinalis muscles which for both choice and prime will have good marbling.
This is a 15 ounce 1″ thick choice rib eye from Wegmans that has a wide white fat seam dividing the two main muscles. It has an okay sized spinalis muscle that is in the shape of a cap and which you can see has much better marbling than the eye muscle. There is virtually no tail muscle on this steak.

This is a 19 ounce 1 1/2″ thick prime rib eye from Whole Foods with a narrow fat seam dividing the eye muscle from a very large double spinalis muscle which makes up over half the steak. There is the main spinalis on the right and a round spinalis minor muscle next to it. The eye muscle is below the white fat seam and there’s about a 1 1/2″ tail on the left of it.
How Do You Want Your Steak Cooked?
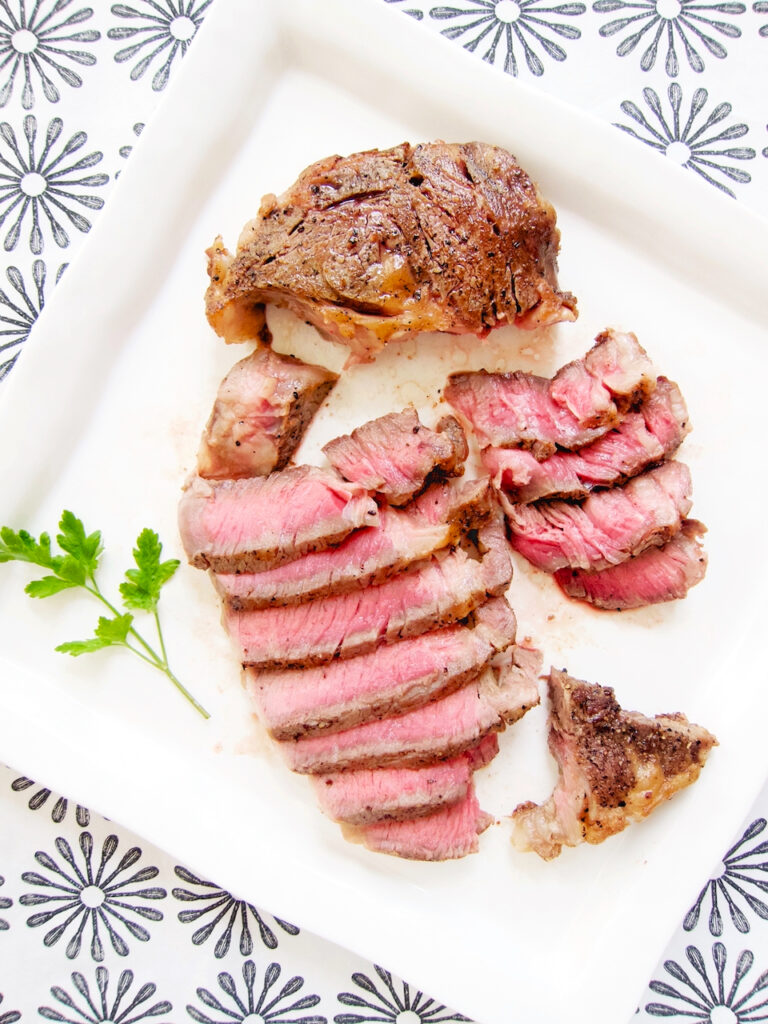
You will need to learn how you like your steak cooked, and along with this, how to look at the steak to determine how much time it’s going to take to sear it, and if it’s a thick steak, how long to cook it in the oven. For most people, the ideally cooked steak is in the range of medium rare. You may prefer it to be more medium or more rare but as far as mastering your method, this is your goal. You will be the most happy with your progress when you can consistently achieve results that are within that range.
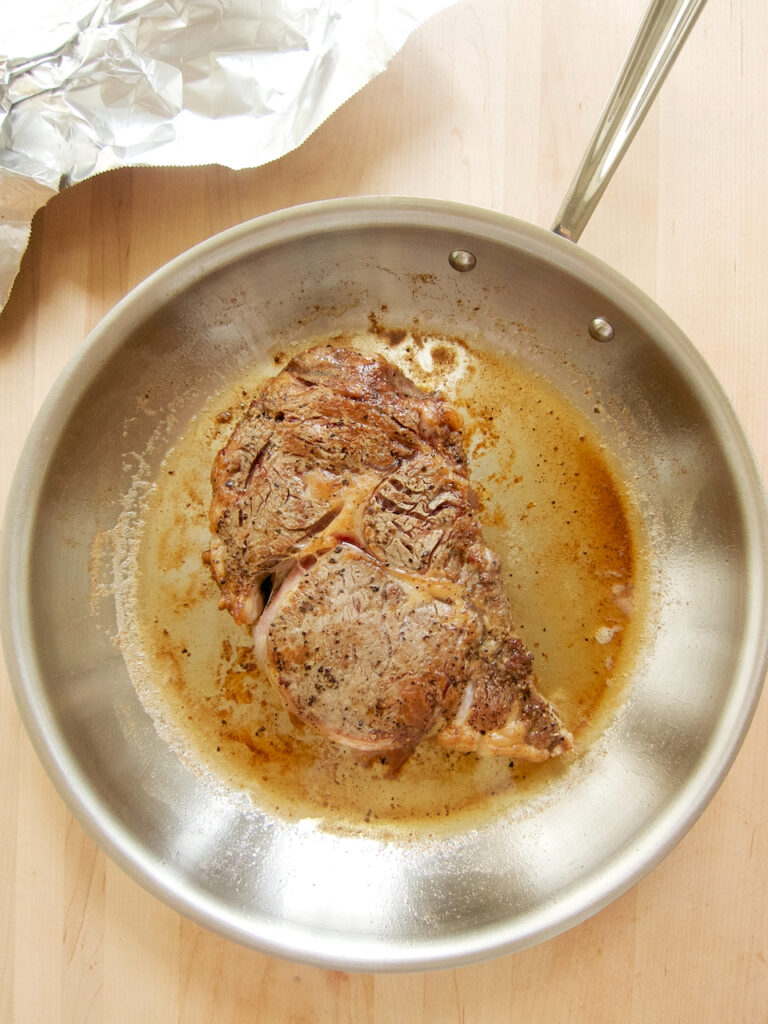
This is the 1 1/2″ rib eye steak seared for 3 minutes on each side, then baked in a 450° oven for 6 minutes, pulled out when the internal temperature was 127° on an instant read thermometer.
Choosing a Good Method
If you watch some videos online, you get a feel for what you are going to be doing, what order you want to do them in, what you can try out if you want, and what you don’t want to do. These will help you make a plan. I recommend making a check list so you don’t skip a step.
As you do your research, you are going to find that there are a lot of choices to make and it can feel a little overwhelming. Does the salt go on ahead of time and the steak hangs out on plate on the counter until room temperature, or is more brining time better and it should go in the refrigerator for several hours, or overnight, and then on the counter? Does the pepper go on when the salt goes on or do you put it on right before you cook it, or do you do it after it’s cooked? Are you going to oil the steak and put oil in the pan? Do you need to bring the meat to room temperature or is cold okay? Do you want to do an overnight dry aging of the steak on a cookie rack set in a baking sheet in the frigerator like Chef John (2:30) does? Do you want to combine the overnight salt brining with the overnight dry aging by putting the seasoned steak on the cookie rack set up so the entire surface dries? Is using a meat thermometer the best way to know the meat is cooked right? Do you want to use butter? Do you want to add herbs and garlic when you add the butter? Do you want a sauce for your steak? These are some of the little nuances of steak foodies.
Here’s a variety of videos you may enjoy.
This video will show you an experiment you can do to decide when you want to salt your steak.
This video will show you How to Heat a Pan. The Leidenhouse effect is demonstrated.
In this video, this chef is cranking up the heat and using a cast iron pan and the results are a very crispy crusted steak (and a lot of smoke).
This video made for All Clad shows you how to cook a steak that is about 1/2″ thick and won’t need to finish cooking in the oven. I want to mention here that he has you cook both sides of this thin steak for 3 minutes. This is probably a medium well done steak. If you have the pan at the Leidenhouse temperature, you’ll want to cook it about 1 to 1 1/2 minutes on each side for medium rare. Also he does a quick pan sauce using balsamic vinegar. For a quick pan sauce that is more of an au jus so you are still only tasting the simple beef steak flavors, pour out most of the fats so it’s only coating the pan. Then add 1/2 cup beef broth and as it’s heating up stir to deglaze the fond from the pan. Reduce the broth to 1/4 cup and then stir in a cold tablespoon of butter until it has completely melted.
In this video the chef will tell you that he made the video because he thinks everyone is cooking steaks wrong. But it’s not really wrong if it works for you so don’t let other videos intimidate you about any of the methods you have chosen that are working for you.
This video shows you the hand tool for beginners who want to learn how to test doneness with their finger (go to 6:30 in the video). It’s not something you continue to do. It’s just a very helpful temporary teaching tool until you’ve had enough experience that what medium rare looks and feels like becomes second nature to you.
In this video a chef will show you how to cook steaks on a restaurant grill with a wood fire. With advanced techniques he is able to cook a steak well done and it’s still tender.
Craig’s Indoor Method for Cooking Great Steaks
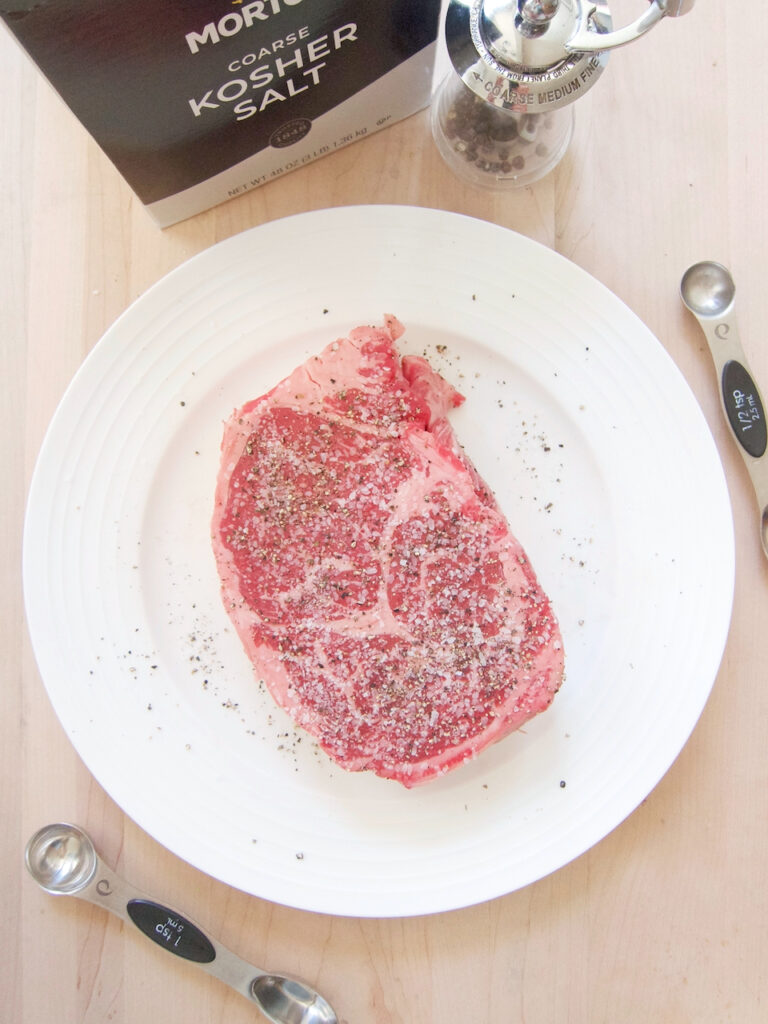
Step 1. Craig prefers thick steaks, somewhere between 1 1/2″ to 2″ and he buys prime steaks at Costco. His method for cooking steaks begins with very lightly coating them with oil, sprinkling them with coarse salt and pepper. Use 1 teaspoon each of salt and pepper per pound of meat (or to taste) and press it into the meat. Set them on a plate and leaving them on the counter to come to room temperature*. Having the salt on it for 45 minutes to a hour draws out water then pulls it back into the steak.
(Option 2. If you have time, age drying the steak overnight will result in a better sear. Sprinkle the steak with salt and pepper and press these in. Lay the steak on a cookie rack in a baking sheet and put this in the refrigerator, uncovered, for 24 hours. The next day the pepper will still be there but the salt will have all been absorbed into the meat and the steak will be a darker red. Rub with the oil and leave on the counter to come to room temperature. Notice how much drier looking it is. This is why it will brown more.)
*Through experience you will learn that bringing it to room temperature is necessary because by the time you’ve cook cold steaks getting the center up to 130°, the rest of the steak will be overcooked. Or you get the outside cooked right and the middle is still raw.
Step 2. When the steak is almost ready, preheat the oven to 450°.
Step 3. Heat a heavy bottomed stainless steel pan. You will have to learn through trial and error what the ideal setting is on your stove. It’s going to be in the higher range (on an electric stove you could start around 7). And you will also learn how long it takes for your pan to get hot without getting too hot from having sat there empty for too long. I set my stove to 7 1/2 and the pan is ready in 8 to 9 minutes. I test it with water, dump out the floating water balls of the Leidenhouse effect, and add the oil.
When you are searing meat you are creating some beautiful brown caramelization on the outside that is a key flavor of your steak and also makes them look nice.
Step 4. When the pan is at the right temperature, drizzle in enough avocado oil (avocado oil has a high smoking point) to cover the bottom of the pan, usually about 1 tablespoon. Lift and turn the pan to cover it. You will then watch for the oil to have ripples in it when you tilt it. This takes seconds because the pan is so hot.
Step 5. Using tongs, gently place the steak in the pan. Let it sizzle undisturbed for at least 2 minutes. It’s okay to flip it over and after the other side is seared, flip it back and cook it some more. When you turn it over and it’s searing on the second side, it’s time to add some butter, about 1 tablespoon. As the butter is melting, tilt the pan so the butter slides under the steak and take a large spoon and scoop up the butter that has slid over to the side and ladle it over the steak. Baste it with the butter like this a few times as it’s searing.
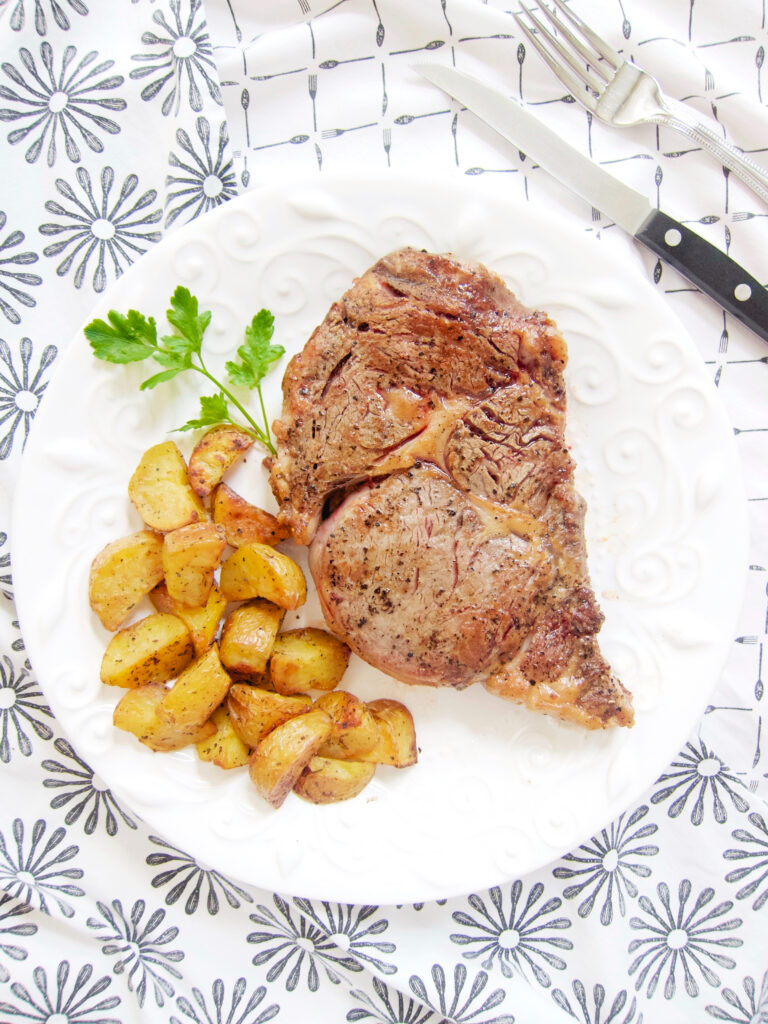
Step 6. With 1″ and under steaks, you test for doneness at this point and cover the steaks with foil and let them rest. For thicker steaks, you finish the cooking in the oven.
Craig uses both an instant thermometer and his finger to test for doneness. For medium rare, you want around 125° to 130°. Master steak cookers have learned how to test how cooked a steak is by pressing down on it with their finger. This is a great option or to use in addition to a thermometer so if you take the time to practice it, it’s well worth it. There’s a learning tool that you start with until you’ve cooked enough steaks that knowing the right resistance becomes second nature. The tool is your hand. The resistance of the steak is compared to a place on their hands that have different resistance and tells them if the steak is rare, medium rare or medium. (See video starting a 6:30)
If you have finished searing both sides of a steak that is in the middle range between thin and thick and it doesn’t feel ready or isn’t at 120° to 130°, transfer the pan to the oven and let it cook about a minute and check it again.
The thicker steaks may need up to 8 minutes in the oven depending on the size and thickness of the steak. I prefer my medium rare steak more towards medium than towards rare and while I’m very new at this, I’ve found a steak to be in the range of what I like when it feels like what it feels like when I press down on the pad below my thumb while the tip of that thumb is touching the first finger tip. It’s too rare for me when it feels like the pad when that thumb is not touching the tip of any finger.
Step 8. When it’s done to your likeness, remove the pan from the oven and cover the steak with foil and let rest 5 minutes. During this time the outside will relax and reabsorb some of the juices.
If you do a good job of cooking your steak, using only the salt, pepper and butter, you are going to enjoy just experiencing the flavor of the beef itself.
You can add garlic, fresh rosemary and thyme when you add the butter to the pan as the steak is cooking.
Another option is making a compound butter ahead of time that you slice and lay on the hot steak to melt. There are a lot of other ideas for compound butters online.
For an au jus so you are still only tasting the simple beef steak flavors, pour out most of the fats so it’s only coating the pan. Then add 1/2 cup beef broth and as it heats stir to deglaze the fond from the pan. Reduce the broth to 1/4 cup and then stir in a cold tablespoon of butter until it has completely melted.
I have listed some sauce links below if you want to try a sauce.

Sauces
Getting into steak cooking outdoors includes rubs and barbecue sauces. Indoors it’s about French sauces and I don’t know if anyone does it better than Chef John. After watching these, it’s clear his sauces are upstaging the steaks that have become more like transportation devices for divine French sauces.
Chef John’s Bourbon Pepper Pan Sauce
Chef John’s Manhattan Filets With Bordelaise Sauce Part 1
Chef John’s Manhattan Filets With Bordelaise Sauce Part 2
Chef John’s Demi-Glace Sauce Part 1
Chef John’s Demi-Glace Sauce Part 2
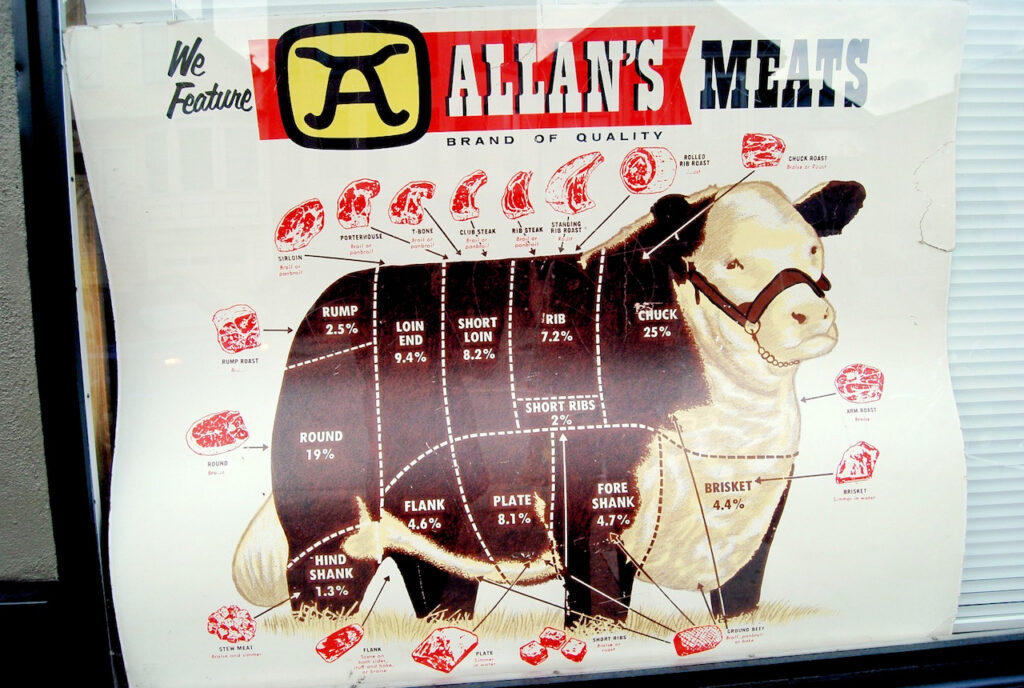
Cuts of Beef by Katie Spence